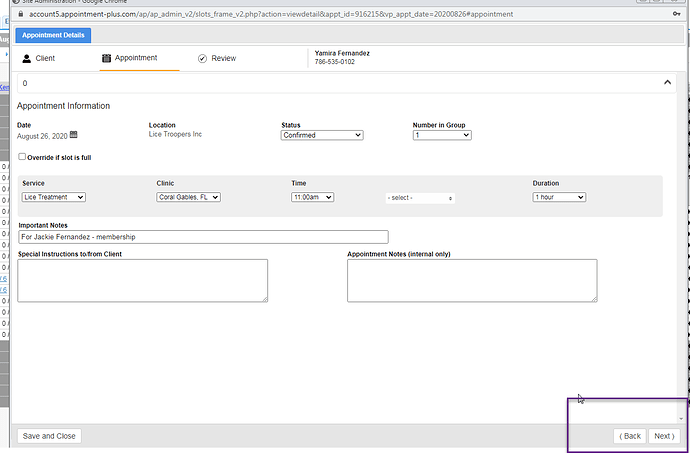
How can i add multiple screens of lightbox form in dhx scheduler, which comes one after one by click next, Because I have many fields and form will be big in one screen, I try but all is vain, Example image below which like I want
Please help me @Polina @Siarhei @Aliaksandr @Stanislav
Hello @Rijwan_Mohammed,
The current lightbox implementation doesn’t support multiple pages, so you will need to create a custom one.
You can read about custom lightbox by the following link:
https://docs.dhtmlx.com/scheduler/custom_details_form.html
Or, you can create a custom section with many pages, read about the custom section by the following link:
https://docs.dhtmlx.com/scheduler/custom_lightbox_editor.html
Didn’t understand , Because i already use custom lightbox, Can you please show me what i want ??
Hello @Rijwan_Mohammed,
This question more relates to the javascript, than for the scheduler component, as you have to implement some HTML with custom navigation elements. This means, that clicking of nav buttons will hide or show some content.
Here is the list of important code fragment:
// CSS

  .active{
    display: block;
  }
  .hidden{
    display: none;
  }

// HTML(div of the lightbox)

<div id="my_form">
  <div class="tabbar">
    <button id="tabMain">Tab Main</button>
    <button id="tabSec">Tab Secondary</button>
  </div>
  <div id="mainCont" class="active">
    <label for="description">Event text </label><input type="text" name="description" value="" id="description"><br>
    <label for="custom1">Custom 1 </label><input type="text" name="custom1" value="" id="custom1"><br>
    <label for="custom2">Custom 2 </label><input type="text" name="custom2" value="" id="custom2"><br><br>
    <input type="button" name="save" value="Save" id="save" style='width:100px;' onclick="save_form()">
    <input type="button" name="close" value="Close" id="close" style='width:100px;' onclick="close_form()">
    <input type="button" name="delete" value="Delete" id="delete" style='width:100px;' onclick="delete_event()">
  </div>
  <div id="secCont" class="hidden">
    <p>Secondary content</p>
  </div>
</div>


// JS, part relates to show/hide content:

scheduler.showLightbox = function(id) {
  var tabMain = document.querySelector("#tabMain")
  var tabSec = document.querySelector("#tabSec")
  var mainCont = document.querySelector("#mainCont")
  var secCont = document.querySelector("#secCont")
  tabMain.onclick = () => {
    mainCont.className = "active";
    secCont.className = "hidden";
  }
  tabSec.onclick = () => {
    mainCont.className = "hidden";
    secCont.className = "active";
  }
...
Here is a simple example of a custom lightbox with nav buttons(HTML/JS tabs):
http://snippet.dhtmlx.com/5/18654d49f
It’s just an example, and you can research more complicated solutions on the internet.
