[size=200]Adding Map View to your Joomla Scheduler[/size]
This worked Great for me with Advice and Guidance by Stanislav and ilya .
( Thought the least I could do was a tute to thank you guys for all the help ![]() )
)
This is for scheduler for joomla version 2.3 .
( I cant say whether it would work in Wordpress but if it does please post )
Before even attempting this PLEASE BACK UP YOUR SITE AND DATABASE !
This is taken from this post Here
EVERYTHING MUST BE DONE IN ORDER !
So Do every Step EXACTLY as I have written it here
Any problems please ask as I know different people have different set ups
But remember , This is for the JOOMLA COMPONENT
and nothing to do with the Standalone Version
So Lets Begin ![]()
Open Joomla admin section
Goto :- Components/Scheduler
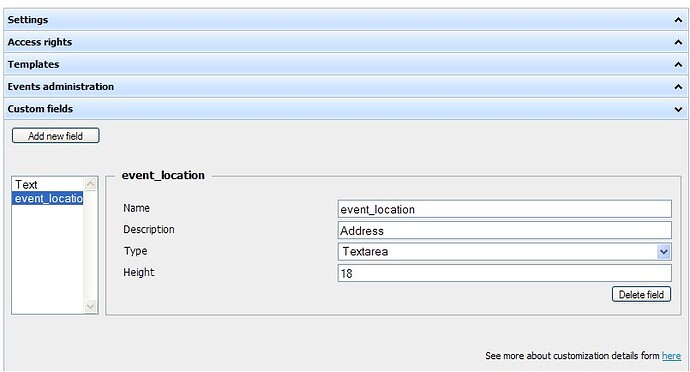
Click on Custom Fields and add a new field as in the pic below
Name MUST be event_location …Description can be whatever you like
Type = TextArea
Height = 18
Repeat with another 2 fields Remembering that the names must be exact . Descriptions can be what you want .
These next 2 fields will never have to be used as they self populate from the event_location field
for eg. 27 rochester blvd chicago usa
If it doesnt , fill in some more info in your event_location field
( Although googles pretty good at picking up the locations )
Once you put this address in the event_location field when creating an event in your scheduler,
it will find the co-ordinates for the lat and lng fields automatically .
So these fields in your lightbox will most likely never be used by you
( Trying to work out how to hide them , Once I do i will edit this tute )
So Lets go ahead and create 2 more fields
Name MUST be lat …Description can be whatever you like
Type = TextArea
Height = 18
Name MUST be lng …Description can be whatever you like
Type = TextArea
Height = 18
*Upload files Out of the attached package needed for Map View
( Unzip and upload components folder as it is via ftp into your public_html or subdomain folder or you can unzip it and do individually as per below)
Upload dhtmlxscheduler_map_view.js and dhtmlxscheduler_ext.css
to the components/com_scheduler/codebase/ext folder
Then Upload dhtmlxscheduler.js to the components/com_scheduler/codebase folder
( This file will overwrite your existing one . If asked say yes to overwrite )
Edit Files .
Open components/com_scheduler/codebase/dhtmlxSchedulerConfigurator.php
( either download via ftp and edit with notepad++ or similar or edit through cPanels filemanager etc )
( if on a mac try textwrangler )
This part will add a new TAB to the calender which will take you to the map section
Find :- ( In my file it was around line 844 )
$scheduler .= "
            </div>
Replace with this :-
                       $scheduler .= "
                       <div class=\"dhx_cal_tab\" name=\"map_tab\" style=\"right:470px;\">Address</div>
                       </div>
( the word ‘Address’ in the code above is My Navigation Label . You can call this what you want. Also the 470px is to position the Address TAB, You may need to alter this to suit your layout )
Save Then (if ftp)FTP Back to folder ( If cPanel etc:- Just save )
Open components/com_scheduler/scheduler_include.html and add this
( It should be empty to begin with if its a clean scheduler install )
[code]
[/code]Save Then (if ftp)FTP Back to folder ( If cPanel etc:- Just save )
Go to the front end ( Your Site ) of joomla and refresh the page
You May need to Clear your Cache then reload your page and your map should be there in your new Navigation Tab !
(This is assuming that you already have a menu item created for the scheduler. If not go to Menu Manager in joomla , Select your menu for eg. Main Menu . Then select New and choose scheduler to create your new menu button )
Your browser may also ask you at this point( Depending on browser )
Whether you want to Share Location . Just answer this the way you want
Although to stop it continually asking, it is best to say yes
++++++++++++++++++++++++++++++++++++++++++++++++++++++++++++++++++
If you wish to disable the google sensor add the next piece of code in scheduler_include.html
<script>
scheduler.config.map_resolve_user_location = false;
</script>
++++++++++++++++++++++++++++++++++++++++++++++++++++++++++++++++++
And thats it. If you did everything correct and have any troubles please post here .
*Below Is attached the necessary files needed for the map view to work
components.zip (26.6 KB)


 Future events show up on Agenda and Map views.